Tuesday, August 23, 2011

Happy Birthday Banner & Ribbon Garland

I recently made this ribbon garland, and wanted to share...
I went to my stash, didn't purchase a thing, and made this. I love that it is wrinkled and messy--and that was intentional. I took care to only select ribbon, fabric and scraps in bold/bright colors. No black, brown or pastels here.
Next, I added two gerber daisy flowers that I had on hand. They were attached to the garland with alligator clips that were hot glued onto the back.

The ribbon garland as-is would be a great backdrop for a child's birthday photo. But this was for an adult. So I added another layer...
I created a "Happy Birthday" banner using solid pieces of 2x3" cardstock, twine, and a pack of Jolee's Boutique felt Happy Birthday stickers. I used my Stampin Up bracket punch to layer the letter stickers, and also used a sheet of striped paper that was colorful and made it all stand out. I cut a "v" into the bottoms of each of those, to make it look more like a banner.
And here is the finished product, hung from a mirror in my entryway. Easy peasy!

Enjoy your day!

Monday, August 22, 2011

Cinnamon Honey Butter


I know, I know. Yes, I found it on Pinterest. Yes, I'm hopelessly addicted...

And yes, I'm going to share another fun one with you today...

Cinnamon Honey Butter. Completely amazing, fantastically delicious, and wonderfully simple to make. I dare you not to try it and make some for your friends. They'll thank you for it--I promise!

You can view the recipe here.

Saturday, August 20, 2011

Back to School Link List

This post is a nod to my favorite DIY projects and free printables for the upcoming Back to School season...
Of course, you'll want a ton of pictures, the first day back and all. Rebecca Cooper created a free down loadable list for all us Mom's who want to capture the important highlights. Love this!
This ruler wreath is a new favorite. I'm SO doing this...

These Rolo Pencils are a great back-to-school treat to leave in lunch boxes as a surprise on their first day...


Modern Parent, Messy Kids has a great set of DIY tutorials found here.

Happy Home Fairy has a great post on free Printables found here.

Eighteen 25 has two adorable projects and free Printables found here.

Tatertots & Jello had a bunch of back-to-school projects found here.

And this 4th grade teacher
has some AWESOME stuff on her blog--Create, Teach, Share. She is wonderful enough to share her stuff for other teachers, so I wanted to pass this along, too. (I love a good teacher!!)

Enjoy the rest of your weekend!

Thursday, August 18, 2011

Awesome!

I was browsing around Amazon, trying to make up a birthday wish list, and came across this:


Needless to say, it went right on my wish list, along with the first volume.

I'm sharing this here on the WIP blog because I just love the concept of this book, and wouldn't it be fun to make our own scrapbooks of awesome to celebrate all the little awesome things we're blessed with? How awesome would it be to look through a scrapbook like this--it would put a great big smile on our faces, no?

I've bookmarked the 1,000 Awesome Things blog, and I plan to check it first thing in the mornings so I can start my day off with happy thoughts. And I plan to start my own Book of Awesome very, very soon!

Wednesday, August 17, 2011

Yarn Wrapped Monogram

Have you seen these monograms lately?
I wanted to make something crafty for a friend who recently had a baby. When I saw all the cute yarn-covered monograms over at Pinterest, I knew that was my next project.

Along with tacky glue and scissors, here is what I used for the project. I ended up having enough yarn leftover for a second monogram.

I thought about painting the wood letter first, in case there wasn't enough coverage, but I opted to wrap it all 2-3 times, so it looked more padded. In the final version, you can't see any of the wood underneath.

I did, however, decided to cover the ends like this, using tacky glue. I didn't want it to look messy, so I took extra care here.

When that was all dry, I started wrapping. I wrapped and wrapped, and kept the yard taught so it didn't relax. I tried to work as neatly as possible, and it ended up being such a FUN project! It is totally doable for a pre-teen to do, too. (Our daughter made one for a friend the day after I finished this one up, and she needed little help from me with it!)

When it was said and done, I raided my stash and added a few doilies and crocheted flowers. Fingers crossed that she likes it!

I hope you give this one a try!

Enjoy your day!

Tuesday, August 16, 2011

Technique Tutorial

Hey there scrappy friends!

Today, I would like to share a simple technique with you, using Jenni Bowlin stamps that were a part of the April kit & pinned buttons part of the August kit.


When creating my layout, It's a Wonderful Think, I wanted to keep with the tone-on-tone look on my page & wanted to use a banner. Instead of whipping out my electronic tools to make my triangles, I used my stamps as a template.


Place one of the Jenni Bowlin banner triangle stamps onto the back of cardstock & gently glide a pencil around the shape.


Use a trimmer to cut the shapes.


Use a small hole punch or paper piercer to poke holes at each corner of triangles & thread string, floss or hemp through, to create a banner. Add pop dots for dimension & embellish.


I truly LOVE the "I'm gonna snap" & "Mom's gonna snap" buttons that came with the August main kit, but didn't want to poke the pin through my pages to use them. I simply removed the pins by using flat nose pliers. To do this, straighten out the stick pin side using flat nose pliers.


Grip the bent hook side of the button with flat nose pliers & grasp the button with other hand & firmly pull entire pin out of button casing. Be sure to not poke yourself.


Once you have removed the pin, use round nose pliers to coil the sharp end several times.


This step is to safely dispose of the sharp pin. If you are like me, I tend to dig through my trash bin for items that may have fallen while creating or if I am looking for something. You don't want to accidentally stab yourself in the process.


Stack two large pop dots to back of button & embellish page.


A quick & easy way to altering an embellishment & using your stamps in a new way. Cheers!

Sunday, August 14, 2011

September 2011 WIP Kits

September 2011 WIP Kits...

Main Kit--$30
Contents of this kit include: 9 Patterned Papers and 1 Cardstock Sheet (2 Kaisercraft Nelly papers, 1 Simple Stories Birthday Paper, 1 My Mind's Eye Lime Twist paper, 2 October Afternoon Boardwalk papers and 3 Basic Grey Out of Print papers), 1 yard of yellow satin ribbon, October Afternoon Boardwalk buttons, Basic Grey Out of Print Cardstock Stickers--Elements, October Afternoon alphabet, My Mind's Eye top 10 journaling die cut, 3 punched die cuts (sept, me & u and 2011), various punched block flowers, 3 die cut ampersands, 6 Kaisercraft Nelly tags, and a kraft 6x6 album.

Here is a close up of the elements in the main kit:
_______________________________
September Add-On Kit--$22
Contents of this kit include: 6 Papers (1 yellow Bazzill scalloped cardstock, 1 LilyBee, 2 DCWV, and two Creative Imaginations, 1 kraft box to embellish, 1 mini notebook, 1 My Mind's Eye grey sticker sheet, 6 dark brown pointed envelopes, 1 black frame, various apple die cuts for the embellished frame, Crate Paper die cut sheet, 5 Shipping Tags, and two mini clear milk bottles with metal holder.
Here is a photo of my altered shadow box frame:

_________________________
September Project Kit--SOLD OUT--thank you!

Contents of this kit include: 5 Patterned Papers (Making Memories, 7Gypsies, LilyBee and Creative Imaginations, 1 LilyBee alphabet sticker sheet as shown, 3 shipping tags, Simple Stories journaling sheet, Cosmo Cricket cardstock sticker sheet, Simple Stories cardstock Sticker Sheet, XL days of the week die cut, 1.5 yards of red grosgrain ribbon, XL doily, and 6x12 Pink Paislee canvas album as shown.

Here is a close up of the kit:
Please email Trish at Turay413@gmail.com to reserve your kit(s) today! They will be made available to the public at noon on Monday!

Enjoy your day!

Friday, August 12, 2011

September Sneak

Just a quick look at what is in the main kit this month...
Can't wait to show you more!

Thursday, August 11, 2011

Summertime, Vacation Time...

I am so inspired by the last two blog posts here by Trish and Jamie! Their travel mini-albums are absolutely legendary! I have just arrived home after a trip out East visiting friends! I am looking forward to using their examples and making my own mini-album! Meanwhile, I am going to share a few photos from my trip...

Speaking of visiting friends, here is one of them, our gracious hostess Aubree. We were eating water ice, apparently a must-have in New Jersey :)

I did not have a single piece of chocolate at the Sweetest Place on Earth. I am simply not a fan of chocolates.  Now show me some sausage...

Yeah baby!  Like these awesome links...  Pennsylvania Dutch breakfast!

Covered bridge in Lancaster County, very romantic indeed...

Jersey Shore, hot hot hot! 

Philly cheesesteak at Pat's, delicious!

Independence Hall...

Sweet sound of liberty!

Now here's to hoping that these pictures will find themselves into a mini-album of sorts in the near future. I will surely share that one :)

Wednesday, August 10, 2011

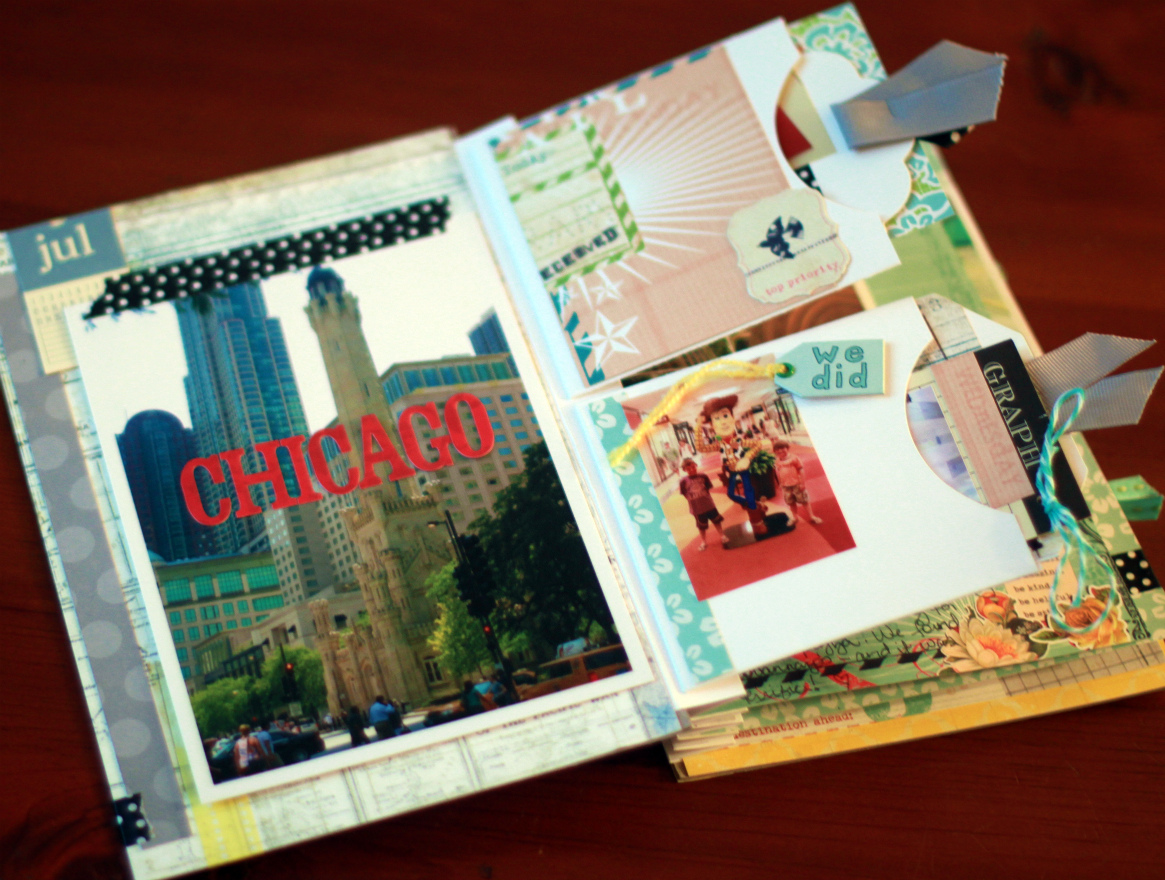
My Chicago Scrapbook

I just finished up a mini book on a recent trip our family made to Chicago, and today I wanted to share it with you. I love it for many reasons...but the top two are...1)I bought it as a kit from our local Archiver's, and 2), I finished the bulk of it before the trip, journaled while on the trip, and then added the photos when I got home.
You may recognize the kit using Pink Paislee's Daily Junque. I didn't make my book according to the directions (I'm not one to follow along those lines--call me a rebel that way.) BTW, if you're interested, they're still available online here. You will also notice that I added a few of my own elements and leftovers here and there. The plastic #5 is an example of a found item put to good use there...
The way they had the book designed, it was interactive with the pockets and tags already. So I just added a little more (because I'm always looking for a unique way to add more photos to my mini books...)
In the above page, I used Smash masking tape as a hinge to showcase 2 more 5x7 photos. On the right, I added 2-3 tags with mini photos into each of the library pockets.

I love how they used glycine bags in this kit. I added another two of my own!
They're cool because you can see a lot through them, and it encourages the reader to peek.
I also added a few iPhone pics in the mini.
The last page stored our receipts to Shedd Aquarium, our fortunes from fortune cookies when we ate Chinese, and a few leftover pictures that didn't quite make it into the mini.
And this photo showcases the binding and the back.

Thanks for letting me share with you today!