Thursday, July 31, 2008

Sweets for the Sweet...

Today was my niece's 16th birthday, and I wanted to do a little something "sweet" for her.

Think this fit the bill?
She's always loved real sour candy, and peppermint (strange, because if it were me, I'd go for the chocolate...) So I created this arrangement of her favs--16 of them to be exact--and it was a hit. I should have included a toothbrush--LOL!

The main newsletter has officially been sent out for the August 2008 WIP kits. The Project kit newsletter will go out before noon EST today. If you did not receive it, please email me and I'll be sure I forward it to you (Turay413@gmail.com).

And can I just say that the design team BLEW ME AWAY with their galleries this month? Make sure you take a look at the Flickr account--I'm in awe that you all are working with me, and I am so proud to have you on board!! I giggled with each email I got--and I opened it as if they were presents!! These next few months are going to be really, amazingly delicious...

Have a fabulous Friday all!!

Wednesday, July 30, 2008

It's all about the mojo!

Hi there! I'm Amy, and thrilled to be posting for the first time on the blog. If you're like me, sometimes you sit down ready to create something fabulous, and you realize you;ve got nothing'! I can stare at my supplies for what seems like hours, and if there's still not much coming to me, I know I have to go somewhere for help. Here are a few things that I find work for me. I hope they can help some of you out there.

Of course, there's the old standby of magazines. The scrapbook magazines out there do a great job of offering up some serious eye candy. Looking through a mag or two usually gets the ideas flowing for me.

There are several scrapbook sites out there for inspiration. A few of them that are full of ideas and definitely worth taking a cruise through the gallery are:

Two Peas in a Bucket
Lifetime Moments
Scrapbook


I also find that blogs inspire me immensely. I can spend hours just reading blogs. Here are some of my personal faves that just inspire me to create:

Lisa Dickinson I just love, LOVE her style. Her LO's always inspire me to create like crazy.
Leslie Ashe It doesn't get any 'sparklier' than this gal. Her LO's just POP off the computer.
Nicole Samuels Her creations are show such diversity to me. I can always find something in each project that I just love.
Jamie Waters OK, I'm not just saying this because she's the guest designer this month, she really IS amazing. Her LO's blow me away. I just love everything that she creates.

There are also several challenge blogs out there that can get the mojo flowing. Here are my personal favs:

Sketch This! I'm not listing this one because I'm on the DT, I really get inspired by Janelle. Her sketches blow me away, and when I have her sketch to begin with, I've created a page that I love in no time at all.
The Design Experiment Yep, I'm on the DT here as well, but I love this blog because it challenges you to scrap something usually about yourself, or something you wouldn't normally scrap. I've created some projects here that I just really love.
How Much is too Much This is an oldie, but such a goodie. This blog challenges you to scrap uand totally helps you use up some of your supplies that you have laying around, which ALL of us have.
Inspire Me, Inspire You This is a newer challenge blog, and I picked it because it's like a breath of fresh air to me. I am usually awed by the wonderful work posted here.

The good thing about the challenge blogs, is that you usually have a chance at winning some great scrapping goodies for completing the challenge. We could all use more scrap goodies, right???

I hope that this post gets your mojo flowing and inspires you to go grab your WIP kit and create something you love.

Tuesday, July 29, 2008

Quickie Invitations

I picked up these pre-made painted wooden pieces at Michael's the other day with the intent to use them as birthday invitations. They turned out pretty cute!I printed out the "invitation" and then cut the puff of engine smoke free-hand. I doodled around the edges and attached the paper to the back of the wooden piece with red-line tape. I folded it for it to fit into the envelopes...
And the other one I used was simple too. I tied string on the back of an airplane to simulate a banner. I simply printed out the party info on a sheet of ledger paper and cut them into strips. Super easy, quick and inexpensive too! The wooden pieces were a quarter each...
If you have any fun invitation ideas, please send them my way! I'd love to share them...

For you local folks, a couple of announcements...

I'm having ANOTHER GARAGE SALE on Thursday, July 31st!! I know you wanted to be notified via the blog, so here is your notice! I'm only doing one day from 8-3, so stop by if you get the chance! And yes, there will be a couple of other garage sales going on that day on my street as well...

Scrap for the Cure II will be held on August 16, 2008 from 9:00 am-9:00 pm at The Nordson Depot in Amherst, Ohio. Cost is $30 and will include lunch, dinner, snacks, beverages, door prizes and a raffle plus 6 ft. of scrapping space for each participant. Contact Laura Manning 440-336-2307, sunnygirl0925@gmail.com for tickets or more information.

a sketch a peek and a goodie for you!

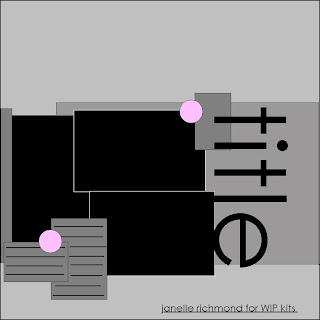
ok a while back i asked what kind of sketches you guys wanted on the blog-- alot of you said multiphoto ones---so guess what i have for you?? yep! a multiphoto sketch---and a little peek of the kit! what could be better!?
here is the sketch:


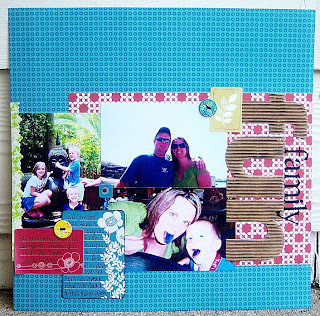
and here is my layout using the sketch with the august kit!


and a little goodie to show your love for work in progress!

Monday, July 28, 2008

Jamie Waters...

I have been a huge fan of Jamie Waters for years now. Her ability to mix patterned paper and embellishments in the most unconventional of ways has been inspiration to not only me, but tons of people in this industry. Her ability to capture her children's personalities on print makes me want to photograph my own kids differently--and I love that too. Here is a sample of a little interview from her, the WIP guest designer for August...How long have you been scrapping?
six years

Give us some insight into your creative process and what or who inspires you:
new photos, new product, something cute that my kids say, an overwhelming feeling-- good or bad :)

If you only had 7 scrapbook items to use for the rest of your life, what would they be?
1. scissors
2. pens
3. patterned paper
4. letter stickers
5. epoxy embellishments
6. journaling block stickers
7. die cuts of flowers and stars

Favorite embellishment I can't get enough of:
sticker sheets

Favorite Food: baked goods :)

Least Favorite Food: anything spicy

Favorite TV show: Brothers and Sisters

Favorite thing: When everyone in my home is happy

Least favorite thing: tantrums

A phobia: heights

An addiction: starbucks iced vanilla lattes

You can check out her blog here and her photography site (she and her hubs Chris are actually available for hire!) She's a Garden Girl on 2 Peas and her gallery and garden seeds are something to bookmark for sure!

Thanks so much, Jamie. Love you girl!

Sunday, July 27, 2008

Photo Card Kits

I posted about these last week, and I finally got a few of these kits made up for sale. You can view the finished cards here.The kit consists of everything you will need to make 40 note cards, and the cost of the kit is $20. All the cardstock note cards, photographs, mounting cardstock, inner lining papers and photo corners are included in the kit--and you can whip up sets in no time at all!
They are available on the WIP website--just be sure to scroll down the page, or you can email me (Trish) at Turay413@gmail.com and I'll be sure to send you a paypal invoice.

I will also be offering two additional special edition mini kits next week...stay tuned!!

Enjoy the rest of your weekend!

Friday, July 25, 2008

Party favors

Hi everyone! Tina here, my first post with the new design team which I'm thrilled to be a part of!

I am a huge fan of all craft related projects. Whether mini books or favors it seems I'm always working on something.

When my kids were younger I was constantly making favors to take in for their classmates and teachers. Now that they are older and don't want me showing up at school with treat bags I've started making favors for girlfriends, family parties and even with friends who call to find out my latest idea. It is an inexpensive way to add some of your personality to any party or event.

Over the years I have made purses, books, candy boxes, frames and all sorts of other fun stuff. My sister and I enjoy getting together to share our latest creations.

One of my favorite places to find creative favors and ideas is at SPLITCOAST STAMPERS. You can browse the gallery full of fun ideas and find directions in the resource section.

Recently I put together this little treat box. Something you could put together for a party in an evening.

  • Starting with a 5" square piece of cardstock, score each side 1.5"
  • Adhere strips of patterned paper 1.5" X 2 to each of the outer center panels
  • Cut two score lines on top and bottom of square
  • fold up and adhere edges to form box shape
  • Punch a hole in each side to add ribbon handle
  • Use a brad to secure ribbon handle
Punch two scallops using the Stampin up scalloped punch to sandwich perfectly over a small sized peppermint patty to fill treat box.


Thursday, July 24, 2008

collage

Hello Friends! Laina here. I’m going to write about some digital scrapbooking today…but I’m not a digital scrapbooker! I will always be paper and glue scrapbooker, I just like to use digital techniques to enhance my paper layouts. I enjoy the process of creating with my hands too much to ever fully convert.

Have you ever found yourself in a scrapbooking rut? Lately, I noticed that many of my pages were beginning to look the “same” and I was having a hard time breaking out of that “same” look. I found that I was relying too much on using my 4x6 prints straight from the picture station at the store. I decided to make an effort to use different photo sizes to break up my page. Instead of printing everything into 4x6, I started to print wallets, 5x7 and 3x5. At home, I can also print any shape or size I want. This helped break up my page immensely.

Now that I have broken free from the 4x6 rut, I am beginning to play with photo collage layouts. Photo collage is a great way to get many photos on a page quickly and begin to build the layout of your page. You can collage your photos by hand by cropping the old fashion way. I prefer to do mine digitally so that the images are at the scale that I want them to be.

I had some leftover SEI chipboard coasters from the August Main Kit that I didn’t know what to do with. After a little time playing on my computer, I came up with a photo collage and sketch that was perfect for these little coasters.

Here’s the sketch:


Here's the finished page:


Journaling reads:
my husband, my sons and my dog...these male beings are my full time job. wash clothes. make dinner. clean bathrooms. read books. help with homework. apply band-aids even if it isn’t bleeding. make sure we always have popsicles and waffles. find missing toys. answer questions. give hugs. sort legos. play candyland. remember things for them. clip fingernails. zip up jackets. give backrubs. the job isn’t easy, but i wouldn’t trade it for anything.

If you work with Photoshop and would like a copy of this template, please email me at hipmama2@oh.rr.com.

Scrapbooks Etc. has a great article on Shaped Collages in their Aug/Sept. 2008 issue, page 142. I also went to their website where they have FREE collage downloads and a step by step video showing how to setup a collage in Photoshop.

The best part about using a collage is that you can output right onto one piece of 8.5x11 paper, cut to size, add to your background and your page is ready to embellish!

Hope you have fun with this one!
Laina

PS Remember to stop by my blog August 1st! In celebration of my first month as a DT member for WIP and the unveiling of all of our August projects, I'll be gving away a RAK of some scrapbooking goddies!

Wednesday, July 23, 2008

Today's Projects...

I woke up this morning and picked these from the garden. Whoever told me about Limelite hydrangeas last year--THANK YOU. The white ones are Annebelle. And the picture doesn't do it justice. That jar is a huge ball mason--not the normal sized...I have three birthdays for two year olds coming up, and so I whipped up three 8x8 ABC albums today. I kept it really simple...

Here are my supplies (you'll need a ton of stickers...but you'll use up your stash for sure...)
Now, most of you know I was a teacher for 13 years. I taught special education, and I worked with a speech therapist who told me about this idea. It totally works--and I used it for my two older children (and their ABC books happen to be their all-time favorite things.)

So the concept is this...

White background. Two strips of 1/2" red cardstock, and a punched star (or a circle, square--whatever.) Every letter of the alphabet has one page. I use the letter (upper and lower case) in the upper left corner of the left pages, and the lower right hand corner of the right pages. See examples...
Then in the border areas, simply use stickers or die cuts from your stash that start with that letter. I got a TON of stickers at garage sales with my kids (and my older two kids helped me find stickers for this project today by looking through their stashes...) Simple enough?
The inside of the main area will contain photographs that pertain to the child. For example, on the "C" page, photos of the child's cousins could go there. A friend named "Cassidy" or a photo of the child pointing to their chin...you get the idea?
This particular book is for a boy, but you could easily make it girly if you wanted as well...

It is perfect for a child around the age of two, when they are still just learning speech. It is a great little learning tool, and kids love seeing photos of themselves in their books!

And as a bonus, on the last page of the albums, I use up all my extra letter stickers and have them search for letters (like where's waldo) and they love that too...

Okay...in other scrappy news...

Jennifer Bueck and I will be teaching a very basic photography workshop at my home on Sunday, August 17th from 10am-4pm. Cost of the workshop will be $30, and it will include lunch. You can see the class description here. This class is geared towards people who have a DSLR camera and want to learn more about taking better pictures. You will need to bring your camera, battery charger and your manual to class. You can register at Turay413@gmail.com. We are limiting the number of participants in this class in an attempt to give you more hands-on attention, so if you are interested, please keep that in mind.

I am teaching my first ever online class over at Debbie Hodge's website, and I couldn't be more thrilled! "Back to Class" will start on August 25 and end on September 14th (three weeks long). For those of you who are interested in creating a school album from beginning (pre-school) to end (12th grade), this class is for you! I have taught this class locally for 3 years now and now it is available to you online! The cost of this class is $20--and you can see more information here. Registration opens on August 1st. Hope to see you there!

Have a wonderful Thursday!!

Looking Ahead

Hello everybody, Francine here!!! I'm really excited to do my first post to the blog today! I have the yummy August kit in my hands and I am working with it, but in the meantime I thought it would be fun to dream a little. Now that the dust has settled from CHA which new products are you most excited to have? Here's my "must have" list:

The Slice from Making Memories. I'm a total tool junkie and the only die cutter I own is a Sizzix Sidekick. The Slice seems like the right upgrade for me!

I also love their Paperie line.

The bEComing green line from Tinkering Ink. Kraft paper! yum!

These mini-albums from Maya Road

I really like the embellishments from the Together Line by Chatterbox. The papers are cool too!

I'm excited about the new line from Ranger by Claudine Hellmuth because I like getting my hands dirty sometimes!

Moda Bella from American Crafts is delish! I also love this and this. And they have cardstock now!

Quirky moustache rub-ons from Hambly! They also have some other awesome stuff like the bicycle papers and these lovelies.

Pretty much all the new stuff from Pink Paislee! I love the new letter sticker font.

And there is so much more I can't remember right now. So tell us, which new stuff will you just have to get?

Cheers
Francine

Tuesday, July 22, 2008

it's dessert time!

well, if you read my "interview" while i was the guest designer for WIP, you would maybe remember that one of my favorite foods was...dessert. any kind. as long as it's sweet, you can be sure that i will love it! so, since it's my turn to post on this fabulous blog, i figured, why not post a recipe of the most delicious dessert i've ever tasted (and it's easy too!)
here's a yummy picture to get your mouth salivating...
and come on...with the strawberries on top...that has to mean it's healthy, right?
i know, i know...that's what i keep telling myself though :)
okay here ya go--
1/4 cup butter (softened)
1 (8 ounce) package cream cheese
1 cup powdered sugar
2 small packages vanilla instant pudding
3 1/2 cups milk
12 ounces whipped topping
1 package of strawberries (cut up)
1 package of your favorite cookie (i used chocolate chip-keeblers!)
so, you just cream the butter, cream cheese and sugar. in a separate bowl, prepare the pudding with the milk. combine the pudding and cheese mixtures. fold in the whipped topping. then go ahead and start with the layering of the cookies/pudding mixture/cookies/pudding/and then finally the strawberries!
easy enough, eh?
it's kind of like a dirt cake (minus the oreos). loooooooooove it!
so, let me know if you make this and love it too!
have a great tuesday y'all! happy dessert making!
peace,
emily

Sunday, July 20, 2008

Work Surfaces & Nicknames

Hi Scrappers! My name is Jana Eubank and I am SUPER-PSYCHED that I get to be part of Work In Progress! WOOHOOOO!

Trish always has such cool things to share that I'm a little nervous about living up to her reputation! I mean, isn't Trish's blog the blog-of-all-blogs!!! But I'll give it a try! ;) Here is a little tidbit from me for today!

I admit it. I'm a dollar-store junkie. I get excited about finding things for a "deal". It's pathetic, I know. But I do! Each Fall when the school supplies start to make their way to the shelves the one thing I MUST stock up on are desk calendars. Yep! Good ol' dollar store desk calendars! Let me tell you why . . . I LOVE to use them as a work surface on my scrap desk.


I flip the calendar pages over and use the plain white back to scrap on. I love having a place to test stamps on, scribble down notes, try out titles, and sketch down layout ideas. I also use the right-hand side to make a running list of all of my DT assignments as well as magazine submission dates or challenge due dates. I'm such a visual person and this system really helps me keep track of everything that I want to remember. If love having those little check boxes in plain view! When the top sheet starts getting too messy or crowded . . . I just tear it off and there is a fresh sheet to work on. LOVE THAT!

Finally, I'll leave you with a recent page I made using the July Work In Progress Main Kit.

I took this picture of my son recently while we were on a picnic. Even though I already scrapped the picnic itself, I LOVED this individual shot of my son and wanted to use it again to document the nickname my husband has recently given him. :)

Everything is from the July kit except for a few clear buttons and some Jenni Bowlin Kindergarten Rubon letters from my stash. I punched the circles from the Teresa Collins Travel Tags & Words sheet to use as page accents.

See you next time!

Jana

Thursday, July 17, 2008

A Mini August Sneak

Hi everyone!!

So here I am with my very first WIP blog post! Woo hoo! I'm a little nervous, but let's just jump right on in, shall we?

I've made a quite a few things with my August DT kit, but I think my favorite thing that I've made with it (except for one particular LO that you can't see yet) is this little mini album using leftovers from the kit.
I am a huge fan of the mini. HUGE. They are perfect for preserving that one special event, or just for celebrating one thing in your life like your favorite cupcake recipes or pictures of your grandson or daughter or places you want to visit someday. They are also perfect for using up those scraps...and that's what I used to make this one.

Ok, so here's how I did it
What you will need is a trimmer or scissors, cropadile or a hole punch, scraps and 2 small envelopes from the August kit, ribbon or jump rings from your stash, a shape punch, and decorative edge scissors or edging punches of your choice.

I built the mini around the two envelopes that come in the August Add-on kit. When I opened up my DT kit, I knew that they would be perfect for a mini album the minute that I saw them. You can use them for receipts or ticket stubs, dried flowers, pictures you just didn't know how would fit into the album but you still wanted them to be in it, love notes, or any other little secret you want to tuck away for later. Endless opportunities!

So, the larger envelope of the two was folded in half and set aside. Then I collected all of my scraps and separated the larger pieces from the smaller...those sheets that you think will make big pages for a mini are the ones you want here. I folded them around the folded envelope and trimmed them down to make sure that everything was the same height and general width. Be careful not to cut too close or you'll open up that envelope. Then I made sure that I alternated the pages so that every other page was pink patterned paper.
I put the little envelope right in the middle, made sure everything was even, and poked two holes with my cropadile. Here, I put it in vertically, but you could also put it in horizontally (which now that I think about it, I kinda wish I had done it that way. Anywhoo....) Don't worry about thickness. It will all fit...trust me. That cropadile can cut through anything!!! If you don't have one, don't worry! You can use a hole punch too, but be sure to make sure all of your holes are lined up. You can easily do that with a straight pin. Also, be sure and cut your holes so that the little envelope is included...that way when you tie the book with ribbon or secure it with rings, your little envelope is securely enclosed and won't fall out. On my mini, I used some ribbon from my stash, but some jump rings would look great too.
Then I started on the edges. I'm obsessed with decorative edge scissors right now, especially the scallops, and I just can't get enough of my butterfly punch. So, I went through the mini and edged a few sheets here and there, making a few pages different lengths for some whimsy. I also cut the edge of little envelope in the center as well for fun.
For the cover, I took my butterfly punch and punched 3 shapes out of the edge. Don't have a butterfly punch? No biggie! You can use any punch you want...heart, star, flower. I thought about going back and adhering some of the blue patterned paper behind it to really make it stand out, and I still might, but decided for now I like the open shape.
And for the finale...I stamped "this book belongs to" on the back of my mini with the Scenic Route Office Stamp set found in the August Add-on kit.

Voila!
One mini album that took me maybe 45 minutes to assemble.

When you guys make your album, be sure and post it in the Work in Progress Flickr Gallery and post a link of it here too so we can oooh and ahhh over it!!

Happy Scrappin!
~Colleen

Pickles.

My husband was teasing me about this photograph. So it doesn't justify the taste. But just trust me...Stop by your nearest roadside stand and pick up a bunch of pickling cucumbers. Run home and make these with your kids. They'll love them. We use a bowl, but you can use a glass jar just as easily...

Pickling cucumbers, whole

4 cups water

1 cup white vinegar

1 heaping Tbsp pickling spices

2 Tbsp pickling salt

Fresh garlic, to taste

Wash pickling cucumbers. Leave them whole until you eat them. Boil 4 cups of water with 1 cup of white vinegar, and let cool. Stand the cukes in a jar, and add fresh sliced garlic to taste. Add water/vinegar mix to jar with the pickling spices and salt. Close the lid, keep in the fridge for a couple of days, and enjoy!


Enjoy your Thursday!

Tuesday, July 15, 2008

Food.

I don't know why, but I go through phases of cooking a lot (usually in the fall) and not cooking at all (usually in the summer). But, I made this tonight and it is worth sharing...

Chicken Parmesan

4 chicken breasts, skinless

14 oz. can stewed tomatoes or marinara

1 egg

½ C. Flour

Bread crumbs

½ tsp. oregano or basil, crushed

4 slices provolone cheese

Cooked spaghetti noodles

Boil water for noodles and cook. Drain and set aside.

Dip chicken in egg wash, then flour and coat with bread crumbs. Fry it up with a little oil in a frying pan, turning after 5 minutes. Once both sides are finished, add a slice of provolone on top and let melt. Add tomato topping of your choice, and place on a bed of cooked noodles. Garnish with Parmesan cheese and herbs, and enjoy!


And I wish I could take credit for this masterpiece, but my friend Jen actually made it for a grad party this past weekend. It was just glorious! I can't wait to host a party and lift this idea. It smelled divine...

I saw that Teresa Collins and a Making Memories were coming out with recipe related product lines. We may have to whip up a mini for an upcoming kit!

Enjoy your evening!

Sunday, July 13, 2008

The Whole Enchilada...

Here are the August WIP Kits!!

The Main Kit, featuring SEI Poppy and the new Creative Imaginations Bloom from Karen Russell...Contents of this kit include: 15 Patterned papers (5 Karen Russell Creative Imaginations Bloom die cut papers, 10 SEI Poppy Papers), American Crafts Thickers—green foam daiquiri, SEI Poppy embellishments—chipboard circles, diecut sticker sheets, alphabet and die cut sheet labels, 4 days calendar pad sheets & 6 random die cuts. One month sub--$34, 3 month sub--$32, 6 month sub--$30.
And so you can get a better look, here are just the papers in the kit:
...and here are just the embellishments...
...and there are a few extras thrown in that aren't even pictured. Whee!!

Here is the August Project Kit which features all 6 of the brand new Heather Bailey Freshcut papers and the beautiful KI Bloom papers as well...and yes, you get a FULL pack of the black American Crafts Getty font stickers (pages and pages of letters--and they've been on backorder since forever!!) The kit also includes the chipboard house mini book and a 7Gypsies portfolio for fun projects...

Contents of this kit include: 13 patterned papers (KI Memories Bloom—5 sheets, Teresa Collins Travelogue 2 sheets, 6 sheets of Heather Bailey Freshcuts from Autumn Leaves), American Crafts foam daiquiri thickers in pink, American Crafts Remarks (FULL PACK) in getty, 7 Gypsies portfolio, Magistical Memories house chipboard mini, Melissa
Frances
mini frames, Magistical Memories circle border, 1 yard velvet ribbon, full chipboard sheet of Heather
Bailey Freshcuts labels, Small, Medium and Large Heather Bailey file folders & labels, and Teresa Collins die cuts. Cost of this kit is $39.


The Add-On Kit contains more KI Memories Bloom papers along with 6 of the new Raspberry Truffle papers from Webster's Pages...and it's loaded with embellishments that will compliment both the main kit and the project kit...
Contents of this kit include: 12 patterned papers (6 Webster’s Pages and 6 KI Memories Bloom), American Crafts vinyl letters—blue poolside font, Scenic Route Office Stamp set, Heidi Swapp Damask Sticker in black, a brown bag, a Manila envelope, Scenic Route black label stickers, Jenni Bowlin green journal label, 6 Heather Bailey Freshcuts Epoxy Brads, full sheet of Heather Bailey title stickers, full sheet of KI Memories Bloom glitter tattoos, Full sheet of Karen Russell label Stickers—Bloom collection and full sheet of KI Memories Bloom Shape Softies--flowers. Cost of this kit is $43.

And because of Christine and Friends over at Willow Traders, I've taken your advice and added a cardstock add-on option that contains 20 sheets of cardstock that will coordinate with the MAIN kit for $7.50. I hope to get a photo of that posted soon to show you...


The kits will go up for sale at noon EST on Tuesday, July 15th. Since the lovely Jamie Waters is the guest designer for this month's kit and we do have a brand new design team in place, I took the liberty to increase the amount of kits made this month. I will also tell you that the Heather Bailey stuff has sold like hotcakes and many of the manufacturing warehouses have it on backorder because of the demand (and I'm SO glad I was ahead of the curve on that one!) I do expect a high volume of kits because of all of these factors, so please take that into consideration when you place your order.

Hope your week is off to a fabulous start!

Saturday, July 12, 2008

A Few More...

I know, I can't stop myself from showing more sneaks...

Tinkering Ink
--and they've gone green--good for them!

Rusty Pickle--the Halloween line looks cute...

I also wanted to mention Kristina Werner again here, because I just love her and her tutorials in general. You should check out her older video clips on You Tube if you are in need of some inspiration...This video (well, all her videos) made me happy today! Go ahead and subscribe--her Make a card Mondays are worth the time and energy to view.

This strap that my friend Jen just got from Etsy. Man, it is beautiful. Check out all her listings for camera straps--they are fun and fresh and made to go across your chest--I have to pick one out soon...

I sent out the autoship notices to all the subscribers for the August kits, so if you did not receive it, please email me at Turay413@gmail.com. I will show the kits tomorrow and they'll be available for purchase on Tuesday, July 15th.

And...

The winner of the RAK is: pickmepam AND KK. Please email me your addresses and I'll get your goods out to you!! Congrats--and thanks for posting the blinkies on your blogs. You never know when those will come in handy for another RAK...(wink!)

Have a super night!

CHA

As most of you know, CHA Summer is around the corner. I've been to a few CHA's before, and to be brutally honest, I never really understood all the hype. I'm not into meeting scrap "celebs"--and I've had much better luck staying home and ordering early before the mad rush. So that is exactly what I plan to do this time around, with no regrets.

Since a lot of people are wising up to that truth, most all of the manufacturers have opted to reveal their new releases online, including issuing show specials. I have spent the better part of this week ordering pieces parts for the next 4-5 months, and can't wait to show you what I have planned!!I have been blessed with amazing reps, and I've even started to receive samples, so I'm getting excited about what is coming down the pike...

While I won't give anything away, I will share a few of my favorites from what I've seen so far (in no particular order...(just click on the links to see more) And yes, a lot of it has already been ordered!! A lot more will be coming through the week as well...

Scenic Route Sonoma--Love it. All of it. And they have come out with really cool panoramic chipboard albums too. YUM.

Scribble Scrabble--I think the Sweet & Sour and the Autumn Afternoon stuff is delish!

Karen Russell--There isn't a single piece of any collection I DON'T want.

Collage Press--Jackson & Camden. My two new BFF's.

American Crafts--Love the Flair stuff and all the Thickers, of course.

Pink Paislee
--The Top Siders in Vintage Moon and Pop Fashion are yummy.

Glitz Design--That Basics line is for sure going to be fun to play with!

7Gypsies--The Savannah Flocked paper will be perfect at Christmas...

Making Memories
--looks like everything they do is on the money lately...

Okay, so what are your favorites so far? Whether you're in love with the links listed here or would like to add some of your own, what are you excited about seeing?

Have a great weekend...and I'll post the winner to the RAK tomorrow...stay tuned!

Thursday, July 10, 2008

Photo Cards

Ah, flowers! I'm obsessed with them. Growing, tending, cutting, arranging, all of it.

I walked around our yard this evening and took some pictures. I picked some flowers. And I took a few more pictures...


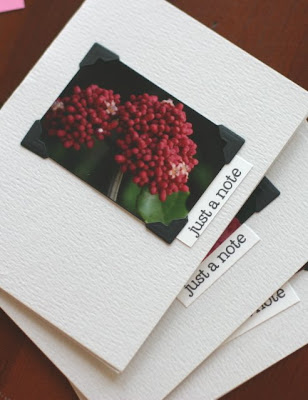
And then I printed some of those pictures out. I mounted them on white cardstock, added a few photo corners, and made sets of photo cards...


I am thrilled with how they turned out, and I hope it inspires you to try it out for yourself.

I sense a special edition card kit coming out soon...

Have a super Friday!